Microsoft 365 Copilot Cost Controls: Spending Policies, Agent Limits and the 1 December Default
Persistent AI agents bill through usage-based billing, and a default spending policy arrives on 1 December 2026. Here's where to set your own limits first.
Persistent agents are the reason I'd move Copilot cost management up your list. These agents sit inside the Agent 365 ecosystem and come with their own identity, mailbox, user account and toolset. That's a different beast from Copilot Studio agents, which are usually started by a user and tied to that user's session.
The persistent agents are described as AI teammates. They run on the GitHub Copilot harness and are billed through usage-based billing (UBB). The harder part for cost control is where they show up. They're reachable through Microsoft Teams chat, through Outlook email, and through comments in Word, Excel and PowerPoint. Spend can build up in places that don't look like a licensing decision at all, so you need controls that sit above any single app.
The 1 December deadline
When Microsoft first released these usage-based billing features, they were switched off by default. That changes on 1 December 2026, when a default spending policy will be set up for Microsoft Copilot Business licences purchased through CSP. If you'd rather define that policy yourself, you need to do it before that date. The details are in the October 2026 Partner Center announcements on Microsoft Learn: https://learn.microsoft.com/en-us/partner-center/announcements/2026-october#4
Microsoft has also added more options for configuring billing profiles and spending policies. More control is good, but it only helps if someone in your organisation has actually decided on the numbers.
Where the Copilot cost controls live
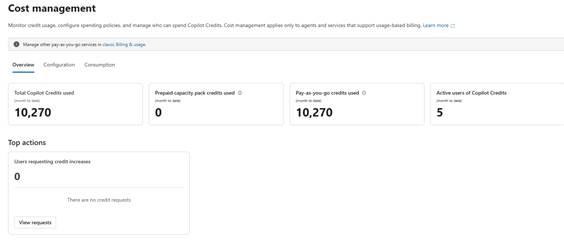
The Copilot FinOps controls sit in the Microsoft 365 admin centre, at https://admin.cloud.microsoft. Go to the Copilot node and then Cost Management. The dashboard gives you a quick read on usage. The screenshot in the source shows 10,206 Copilot Credits used and an account team that has consumed 5,790 credits.

Pricing works out at £10.00 per 1,000 Copilot Credits and £100 per 10,000. Model your monthly spend against those figures before you set any limits.
My recommendation is to agree a monthly budget with your CFO and then allocate it across users, rather than setting limits by feel. You'll likely need at least two spending policies: a general organisation policy and a policy for high-usage or high-value users, sometimes called Copilot VIPs. Depending on how your teams use the tools, you may end up with more.
Building a spending policy
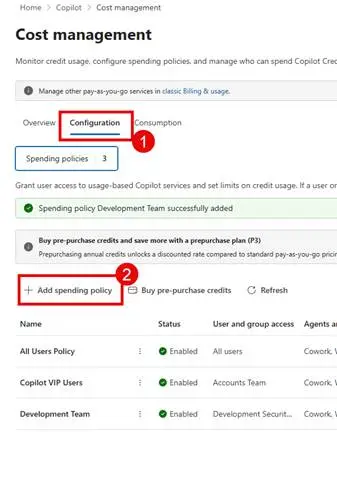
Start in Cost Management and open the Configuration tab, then select Add Spending Policy.
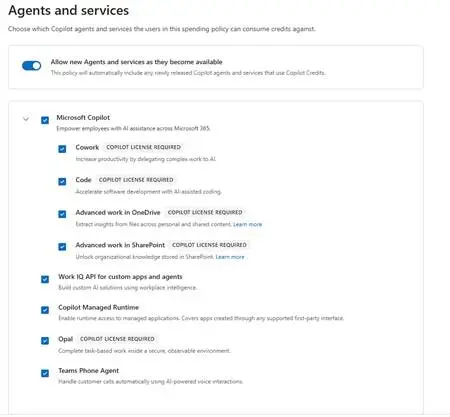
The first screen lets you choose which services the policy covers. The option at the top, "Allow new Agents and services as they become available", deserves attention. It shows Microsoft plans to add more services using this billing model, and this switch decides whether those services switch on automatically. If you want control over when each service is onboarded, turn it off.
Expanding Microsoft Copilot lets you pick individual sub-experiences, and the source describes seven of them:
- Copilot Cowork: a task-based experience for multi-step work on a user's behalf. It needs a Microsoft 365 Copilot licence and consumes Copilot Credits for eligible usage.
- Copilot Code: a software-development experience built on the GitHub Copilot coding harness, governed through Copilot Credits and the spending policy.
- Advanced work in SharePoint: AI-assisted analysis and action over SharePoint content, metered through Copilot Credits.
- Advanced work in OneDrive: the same idea applied to files stored in OneDrive.
- Work IQ API for custom apps and agents: lets custom applications use Microsoft 365 work context and organisational knowledge, with API consumption metered separately in Copilot Credits.
- Copilot Managed Runtime: a governed hosting environment for internal line-of-business apps, with Microsoft Entra authentication, connectors, policy enforcement, central inventory and usage monitoring. Running eligible apps can consume credits.
- Teams Phone Agent: automated handling of calling-related work in Teams Phone scenarios, with eligible usage managed through the Copilot spending policies.
I'm glad Microsoft lets you switch these off at this level. The Managed Runtime option is the one I'd look at closely, because it lets you separate who can create managed apps with code from who can run them.
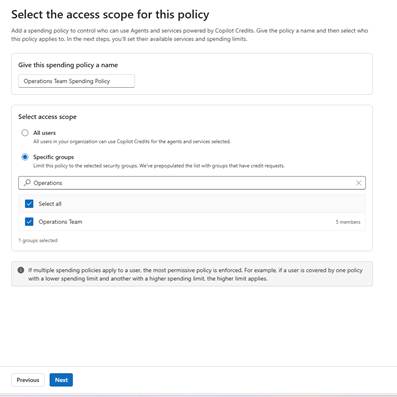
Once you've selected services, click Next and give the policy a name. Then choose the access scope. You can apply it to everyone or to a group, and groups can be either Microsoft 365 Groups or Security Groups. Select the group, then click Next.
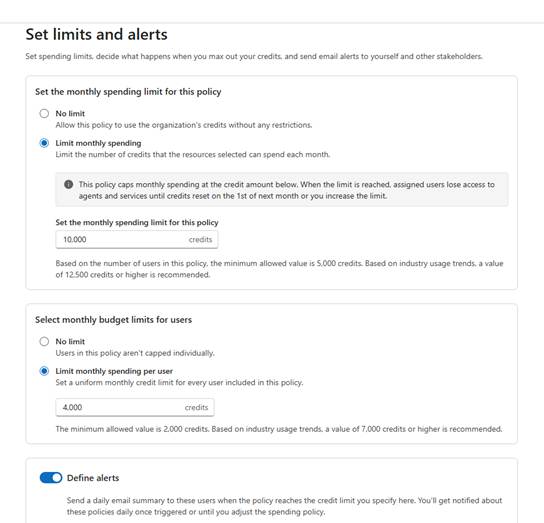
Next come the limits. You can leave the policy unlimited or apply a monthly limit, and the source author recommends the monthly limit. You can also set individual user limits within a plan. The author suggests starting there, so that no single user can consume the whole allocation. If someone gets more value from AI than most, move them into their own policy or group them with other high-usage users.
Alerts come last. You can add a list of users and set a notification threshold based on percentage of consumption or on a specific credit count. You can also trigger an alert when a user reaches a percentage of their capacity. The interface changes depending on which options you've enabled.
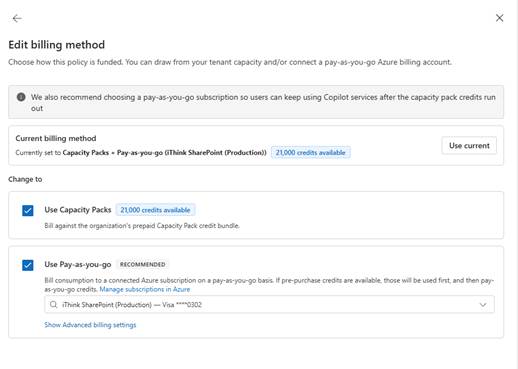
For payment, you can include the policy in pre-purchased payment packs, or link it to an Azure subscription. To link a subscription, you need access to that subscription. Click Next, review the settings and click Create Spending Policy. You can edit it later by selecting the policy and clicking Details.
Reviewing consumption
Setting policies is the easy part. You also need to check who is using what, on a regular schedule. The Consumption tab offers views at policy, user, group and service level.
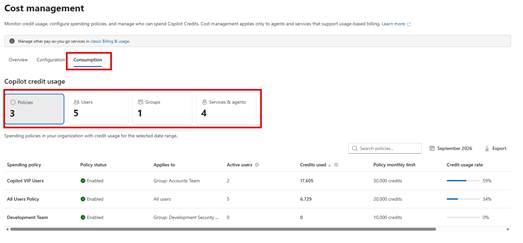
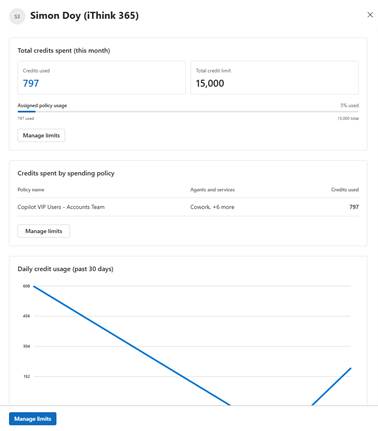
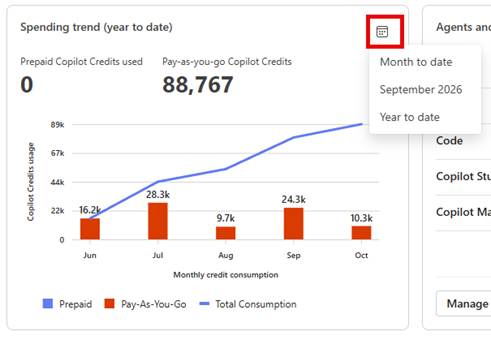
The data changes with the view. At policy level, the filter in the top right lets you switch between the current month and the full year. At user level, you can drill into one person's consumption. That view shows which spending policy applies if the user sits in more than one, along with their daily usage pattern. It's the fastest way to spot a user whose consumption doesn't match their role.
For more detail, the Overview page is where to go. The spending trend chart is the part I find most useful, and you can configure it to show different scopes of data.
Copilot Studio agents and Copilot Credits sit elsewhere
If you were hoping to control Copilot agents and Copilot Credit consumption from the Microsoft 365 admin centre, that isn't where it lives. Those controls sit with the Power Platform admin team. I suspect that's deliberate, to keep Copilot Studio governance in the Power Platform tooling rather than adding more clutter to the Microsoft 365 admin centre. It's an inconvenience if you're working across both, though.
To set up controls for Copilot Studio agents, you need the Power Platform Administrator role. Go to https://admin.powerplatform.microsoft.com, open Licensing, then select Copilot Studio. Copilot Studio credits are paid for either through billing plans or by buying Copilot Credit or message packs.
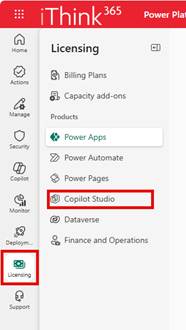
Open Manage Billing Plans to see the existing plans. To create a new one, you need contributor or owner access to an Azure subscription. The author names resource groups with a pattern, copilot-credit-[envtype]-rg, which is a sensible habit to copy. Click New billing plan, give it a name, pick the Azure subscription, choose the resource group, select the services to bill through the plan, choose a region, and pick the Power Platform environments the plan supports. Then click Save.
On which services to include, the author's advice is to put Copilot Studio, Dataverse and Power Automate into the plan and keep the other services separate. That way you can control the Copilot Studio elements on their own.
Prepaid credits across environments
If you hold Premium licences, you get Copilot Credits you can allocate to specific environments. Alternatively, an environment can draw from the tenant-wide pool. Use the Manage Copilot Credits button to control this. The view lists your Power Platform environments with their current consumption and allocated capacity, and it flags any environment that sits outside its allocation.
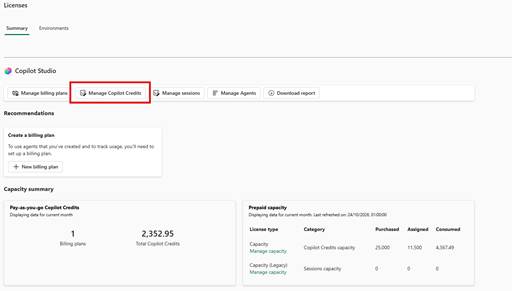
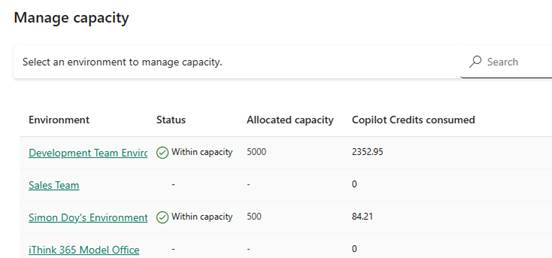
To change an environment's capacity, click its name. From there you can set how many credits the environment gets. You can also decide whether it may draw from tenant capacity. In the author's tenant that option is greyed out, because a managed environment group policy controls it. You can also enable pay-as-you-go (PAYG). The author has it off for development environments but suggests enabling it for production with alerts, so agents keep working if they exceed their credit allocation. Finally, set up alerts.
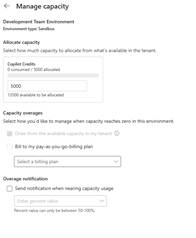
Make sure you allocate enough credits to cover consumption. Without them, your Copilot Studio agents will be affected. Click Save to finish.
The author ran into a problem with the tenant-capacity option. It was disabled and wouldn't update through the managed environment-wide setting. The fix was to switch the option off and back on at the managed environment level. Until then, the author couldn't allocate credits and kept getting an error. If you hit the same greyed-out state, check the managed environment settings before you assume the configuration is broken.
Monitoring agents and setting per-agent limits
To monitor Copilot Credit consumption, open the Manage Agents button under Licensing, then Copilot Studio. You can see every agent across your Power Platform environments, along with its consumption. The view separates credits billed through a spending policy from credits drawn from prepaid capacity.
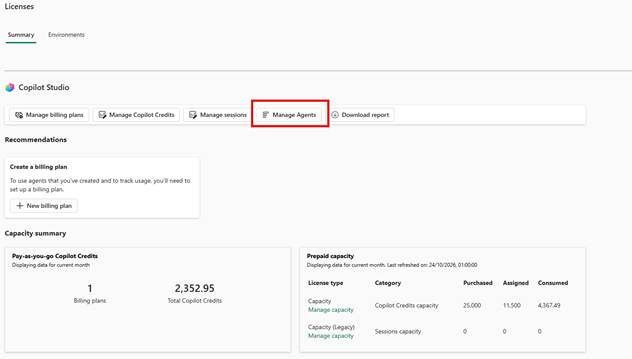
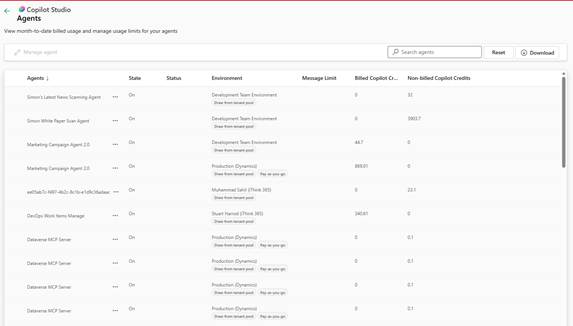
For deeper analysis, click Download Report and choose how many days of history to include.
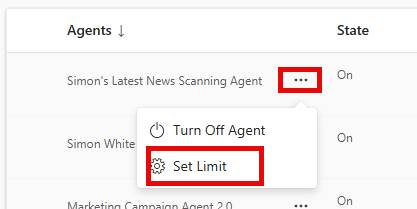
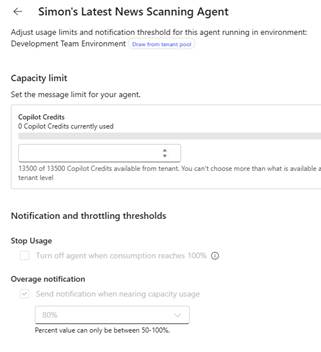
The most useful find in this area is the per-agent limit. From the same screen, click the ellipsis next to an agent and choose Set Limit. You can then allocate a capacity limit to that individual agent. The author calls this a really useful way to put controls around individual agents, and I agree. It's the only place I've seen a cap that sits below the environment level.
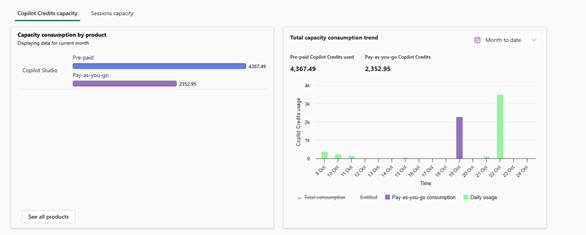
The Copilot Studio monitoring reports and charts are also worth working through. They show who is using each agent, what they consume at pre-paid and pay-as-you-go levels, and which agents burn the most credits. Over a year, that gives you a realistic baseline for budgeting.
What to do before the change window
Here's the practical summary. Decide your monthly budget with finance. Set up a general spending policy and a high-usage policy in the Microsoft 365 admin centre. Switch off automatic onboarding of new services if you want control over rollout. Add user and monthly limits and set alerts. Then, in the Power Platform admin centre, build billing plans for Copilot Studio, set environment allocations, enable PAYG with alerts on production, and set per-agent limits on anything that could run away.
Before 1 December 2026, check whether your CSP-purchased Copilot Business licences will pick up the default spending policy, and decide whether you want to define your own first. The author expects more Copilot cost announcements at Ignite 2026, so this area will keep moving. Build your controls now and review them as new services arrive.


