Blocking Sensitive Data in Microsoft 365 Copilot Prompts with Purview DLP
Purview DLP can stop Copilot from processing prompts that contain sensitive information types. Here's how the policy is built, who can create it, and what users see.

Employees have quickly come to treat Microsoft 365 Copilot as a first stop for summarizing email threads and pulling the key points out of long reports. The risk is that a quick question can carry a confidential detail. A person in a hurry may paste a card number or a customer address straight into a prompt, and that data then sits inside a workflow nobody planned for it. The practical question for admins is how to keep Copilot adoption moving without leaving sensitive data unguarded.
Microsoft Purview Data Loss Prevention (DLP) offers one answer. Its Copilot controls let admins inspect prompts for sensitive information types and decide how Copilot should handle a match. My read is that this is the control most tenants will reach for first, because it works at the prompt itself rather than depending on users to remember what not to type.
Two ways to restrict Copilot with DLP
Sensitive information types (SITs) are the classifiers that do the detection work. Built-in and custom SITs can recognize things like credit card numbers, passport numbers and physical addresses. Once a prompt matches, the DLP policy decides what happens next, and admins can choose one of two actions:
- Restrict external web searches: Copilot can still use internal organizational data to answer a prompt that contains sensitive information, but it can't search the web for that prompt.
- Block prompt processing: Copilot won't process a prompt containing sensitive information and won't generate a response to it.
This walkthrough focuses on the second option. If your concern is that sensitive text should never reach the model at all, blocking is the setting that matches that goal. If the aim is to keep Copilot useful on internal content while limiting outside lookups, the web-search restriction is the lighter touch. You can enable only one of these options per rule, so pick based on which risk matters more for that group of users.
What's supported, and what's still in preview
The block prompt processing option is rolling out in preview to tenants that have Microsoft 365 Copilot and Copilot Chat access. The supported experiences are Microsoft 365 Copilot, Copilot Chat, Copilot Cowork, and Copilot in Word, Excel and PowerPoint.

The preview has a rough edge that matters for rollout planning. In Word, Excel and PowerPoint, users may not see a clear message saying their organization's DLP policy triggered the block. Copilot still stops the prompt and returns no response, but the explanation may be missing. That's likely to generate help-desk tickets, so it's worth warning service desk staff before you switch anything on.
Permissions and licensing to check first
Before building the policy, confirm that the admin account has one of the roles that can create or edit DLP policies for Microsoft 365 Copilot and Copilot Chat:
- Microsoft Entra AI Administrator
- Purview Data Security AI Admin, or the Purview Data Security AI Admins role group
- Purview Compliance Administrator or Purview Compliance Data Administrator
- Purview Information Protection or Purview Information Protection Admin
- Purview Security Administrator
- Microsoft Entra Global Administrator
Microsoft recommends the least-privileged role that covers the task, and that's good advice here. A Global Administrator doesn't need to be the person editing prompt rules day to day.
On licensing, the eligible plans to create a DLP policy for Copilot are Microsoft 365 E5, A5, G5, E3, A3 and G3; Microsoft 365 Business Premium; Office 365 E5, A5, G5, E3, A3 and G3; Microsoft 365 E5, A5, G5 or F5 Compliance or F5 Security & Compliance; and Microsoft 365 E5, A5, F5 or G5 Information Protection and Governance.
Building the policy in the Purview portal
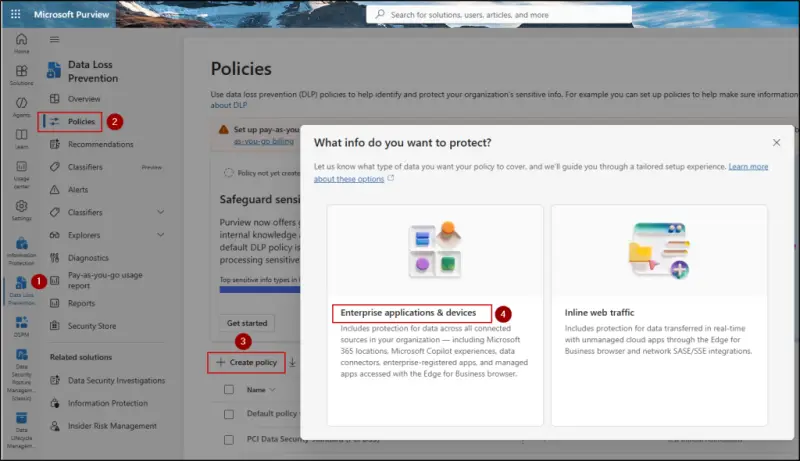
Start in the Microsoft Purview portal and go to Data Loss Prevention. Under Policies, choose Create policy, then select Enterprise applications & devices.

Under Categories, select Custom, then Custom policy. Name the policy and continue. On the next page you can optionally add administrative units to limit who can manage the policy, which is useful in larger tenants where DLP administration is split across teams.
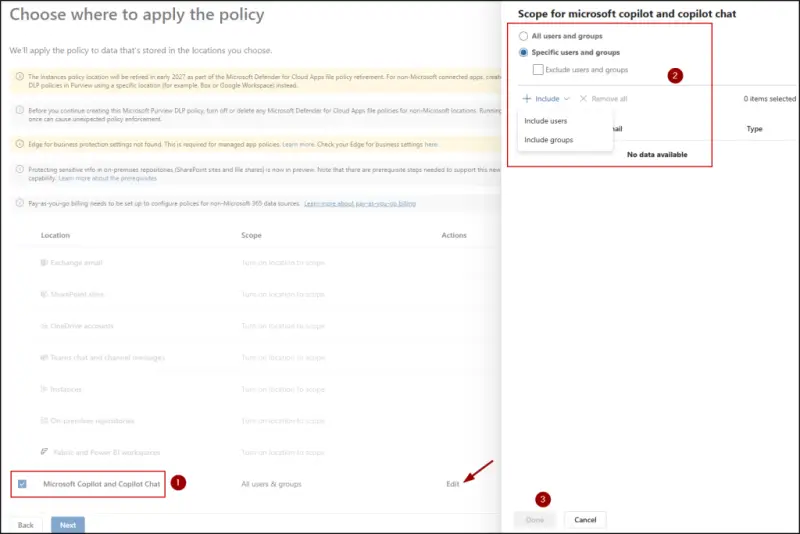
On the location page, select Microsoft Copilot and Copilot Chat. This choice disables every other location, because a policy in this configuration covers one location only. Next, use Edit to include or exclude specific users and groups, then click Done. Scoping to a pilot group first is a sensible way to see how the block behaves before it reaches the whole company.
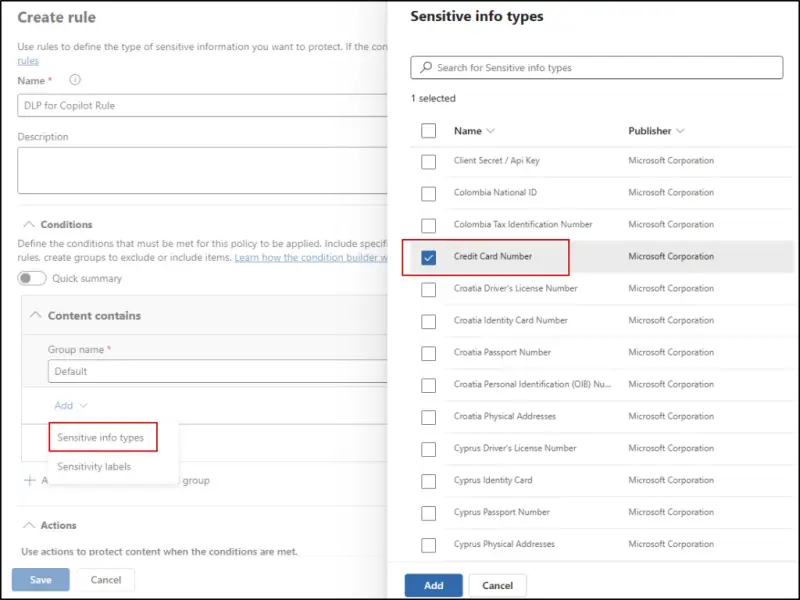
On the Define policy settings page, keep Create or customize advanced DLP rules selected. Then choose Create rule and give it a name. Under Conditions, add a Content contains condition, and from the Add dropdown choose Sensitive info types. Pick the SITs you want to protect and set the confidence level and instance count for each. The walkthrough uses only Credit Card Number as an example. Only built-in and custom SITs are currently available for Copilot prompt protection.
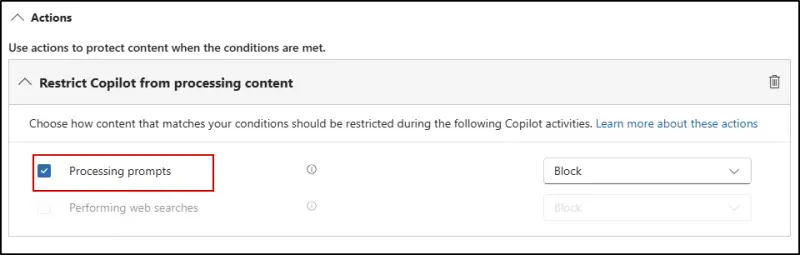
Under Actions, add Restrict Copilot from processing content. Select Processing prompts and set it to Block. The Performing web searches option appears here too, but as noted earlier, only one of the two can be active at a time.
Save the rule, then choose whether the policy runs in simulation mode or is turned on. Simulation is the safer first step in most environments, since it shows what would have matched without interrupting anyone. Review the configuration and select Submit. Allow between 1 and 24 hours for the policy to take effect.
What users see when a prompt is blocked
To test the rule, a user in scope enters a prompt containing a credit card number. Copilot returns this message:
"This request couldn't be fully completed due to your organization's policies. Learn about access restrictions".
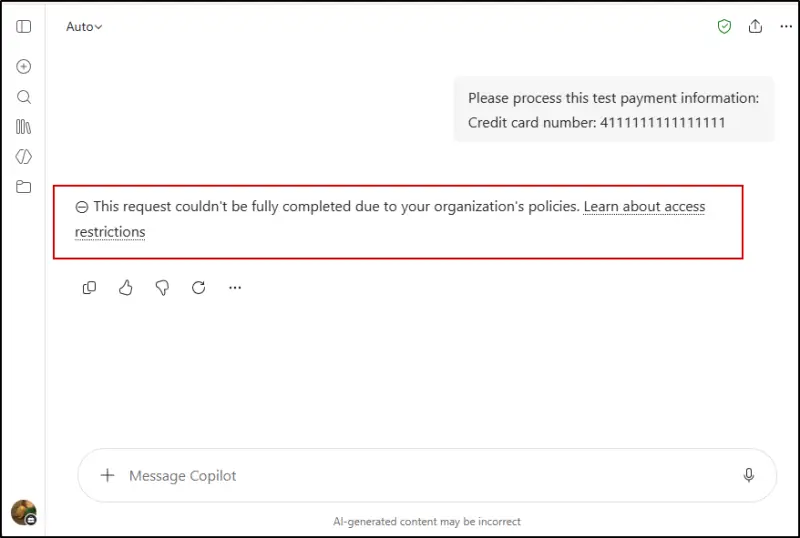
That message confirms the DLP policy fired and Copilot didn't answer the prompt. Remember that the Word, Excel and PowerPoint experiences may show less context than this, so the test should include a user in each app.
Checking matches in Activity Explorer
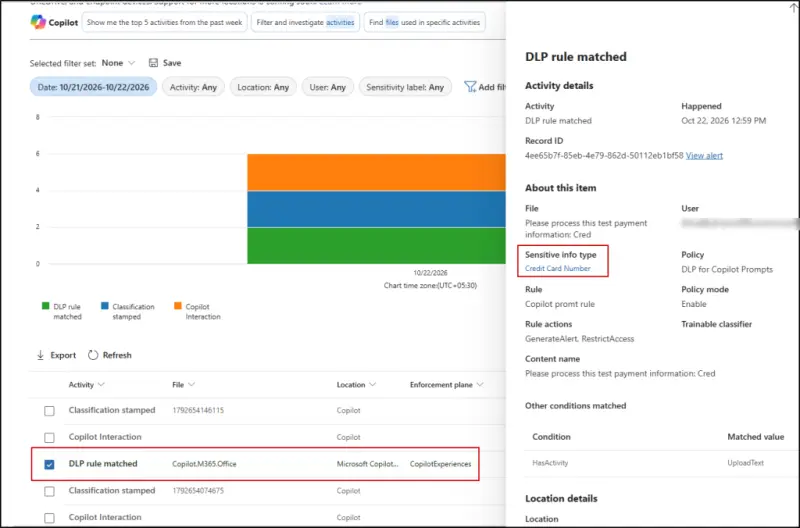
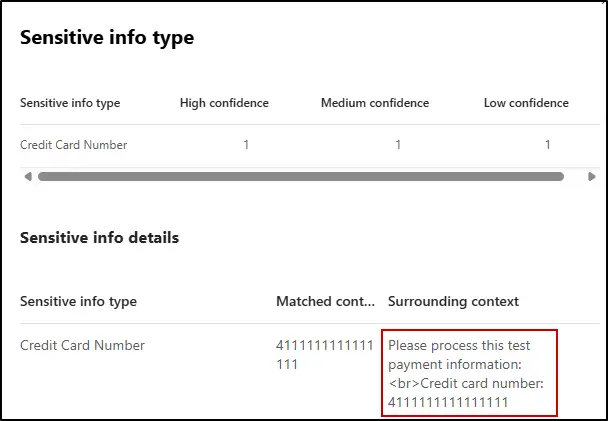
To confirm the rule is catching the right content, go to Data Loss Prevention, then Explorers, then Activity Explorer. Look for the DLP rule matched event, which shows the policy triggered as intended. Selecting the Sensitive info type lets you view the prompt that contained the sensitive information, so review access to that view should be limited to the people who need it.
What to watch next
The practical sequence is clear: confirm roles and licences, build the rule in simulation mode, scope it to a pilot group, test in each Copilot app, and only then turn it on. Because the feature is in preview and the block message can be unclear in Office apps, I'd treat this as a controlled rollout rather than a switch you flip for everyone on a Friday. The payoff is that sensitive data gets stopped at the prompt, before Copilot ever processes it.


