
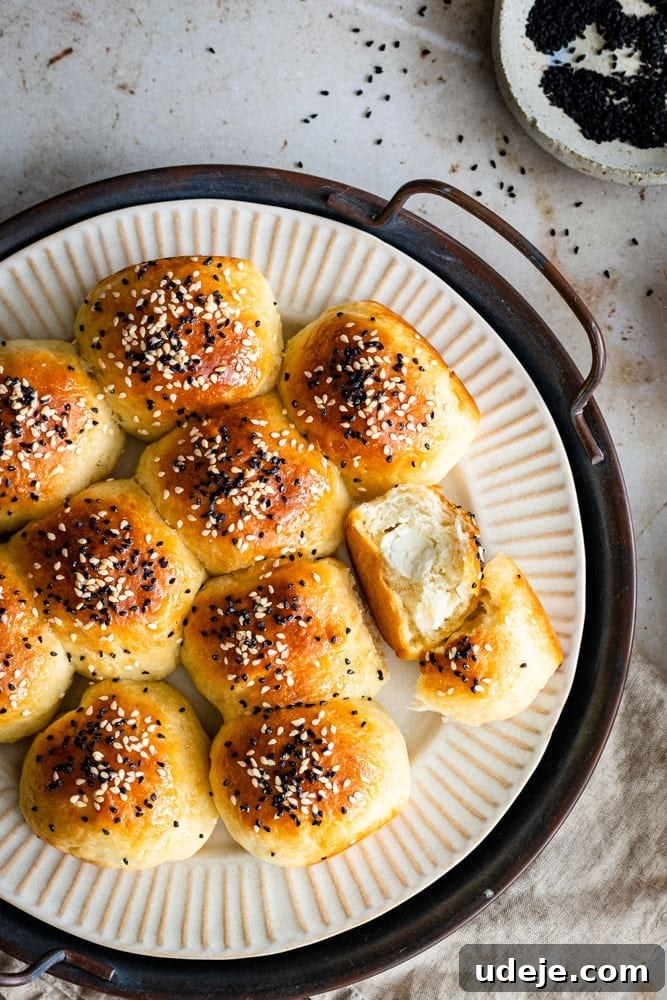
Step into the aromatic world of Middle Eastern baking with our irresistible Honeycomb Bread, known in Arabic as “Khaliat Nahl.” This beloved pastry is a symphony of textures and flavors, featuring individual soft, pillowy dough balls, each generously stuffed with creamy cheese, adorned with crunchy sesame and nigella seeds, and finally brushed with a delicate honey glaze. It’s more than just a bread; it’s a culinary embrace, offering a perfect balance of sweet and savory notes in every bite. What makes this recipe truly special is our signature 10-minute dough, transforming what might seem like a complex bake into an incredibly easy and accessible project for home bakers. Prepare yourself, because these delightful rolls disappear almost as quickly as they’re made!
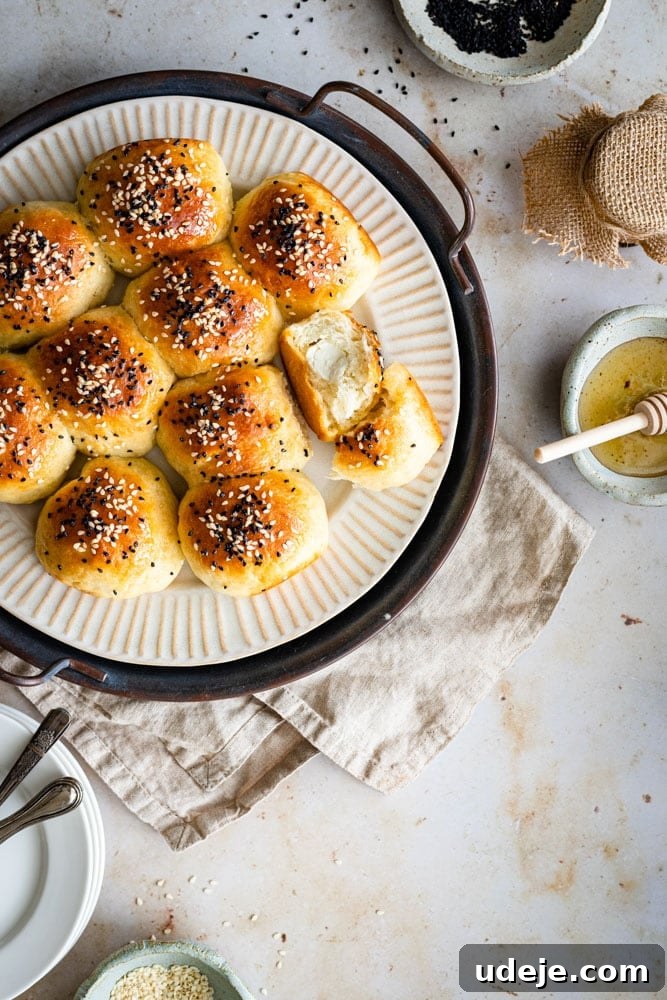
Discover the Delight of Honeycomb Bread (Khaliat Nahl)
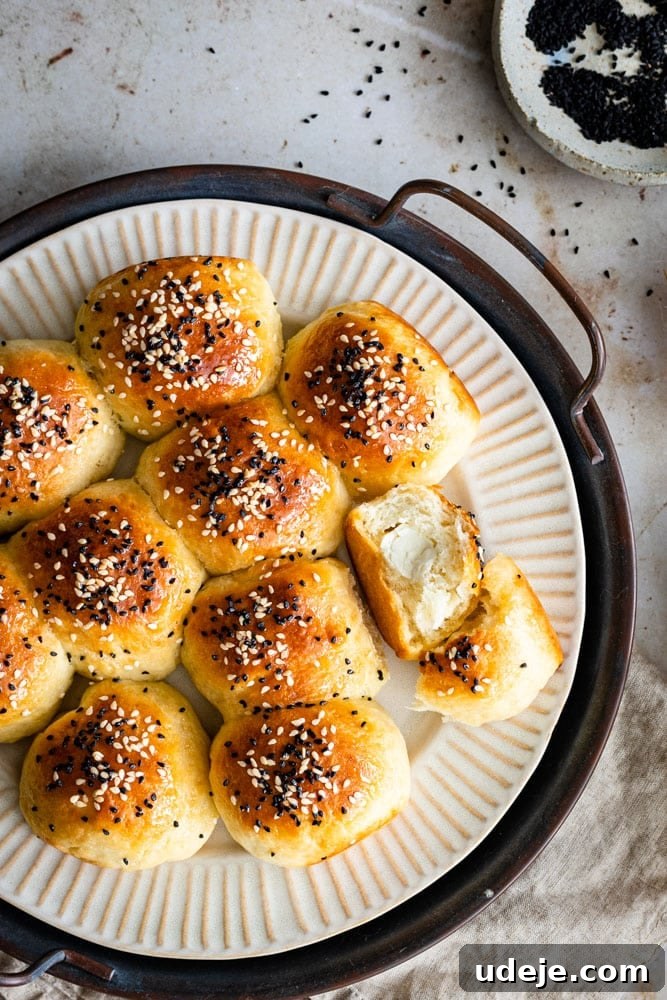
Honeycomb Bread, or Khaliat Nahl, translates directly from Arabic to “bee’s honeycomb,” a name that perfectly describes its distinct appearance. When baked, the individual dough balls rise and merge, creating a beautiful, clustered pattern reminiscent of a honeycomb. This cherished pastry holds a significant place in Middle Eastern cuisine, particularly in countries like Iraq, Saudi Arabia, and Kuwait, where it’s often enjoyed for breakfast, as a sweet snack with tea, or as part of festive gatherings. Its popularity stems not only from its incredibly soft texture and delightful taste but also from its remarkable versatility.
One of the most appealing aspects of Khaliat Nahl is how easily it can be customized. While our recipe features a classic cream cheese stuffing, the possibilities are endless. You can experiment with different types of cheese, from tangy feta to mild akkawi, or even explore sweet fillings like chocolate hazelnut spread (Nutella), date paste, or a sprinkle of cinnamon sugar. The size of the dough balls can also be adjusted, creating mini versions perfect for appetizers or larger ones for a more substantial treat. This adaptability allows you to tailor the bread to any preference or occasion, making it a truly flexible dish for your culinary repertoire.
For the topping, this recipe opts for a simple brush of honey immediately after baking, which imparts a subtle, natural sweetness and a beautiful sheen. Some traditional recipes use a sugar syrup (simple syrup), which results in a much sweeter finish. While that’s certainly an option for those who prefer an intensely sweet pastry, we find the gentle sweetness of honey to be perfectly balanced, quicker to prepare, and a slightly healthier choice. However, one element that is non-negotiable for an authentic experience is the inclusion of sesame seeds and nigella seeds (also known as black cumin seeds). These seeds don’t just add a delightful crunch; their distinct, earthy aroma and slightly peppery flavor elevate the bread, giving it that unmistakable Middle Eastern character that makes it truly magical.
What truly sets this Khaliat Nahl recipe apart is the revolutionary 10-minute dough. We understand that in today’s fast-paced world, long proofing times can be a deterrent for home baking. That’s why we’ve perfected a dough that achieves ultimate softness and fluffiness with minimal waiting. This same reliable dough forms the foundation for other beloved Middle Eastern pastries like Manakish and Fatayer, proving its versatility and consistent quality. Trust us on this one – you’ll be amazed at the results!
The Secret to Softness: Our Signature 10-Minute Dough
The cornerstone of this exquisite Honeycomb Bread is its incredibly soft, airy texture, achieved effortlessly with our unique 10-minute dough recipe. This isn’t just a gimmick; it’s a carefully balanced method that leverages the power of instant yeast and specific ingredient ratios to dramatically reduce traditional proofing times without compromising on quality. Unlike conventional bread doughs that demand hours of rising, this quick-rise version allows you to enjoy freshly baked Khaliat Nahl in under an hour, from start to finish. The secret lies in a “starter” mixture where a portion of the flour, yeast, warm water, and yogurt are combined and left to activate rapidly. This initial proofing creates a bubbly, active base that quickly develops flavor and structure, ensuring a light and tender crumb.
The addition of yogurt plays a crucial role, contributing to the dough’s softness and imparting a subtle tang that complements the sweet and savory elements of the bread. Olive oil further enhances the dough’s elasticity and richness, making it incredibly pliable and easy to work with, even with minimal kneading. The result is a dough that is soft, slightly sticky, and supremely forgiving, making it ideal for stuffing and shaping. This innovative approach means you can whip up a batch of these delectable pastries whenever a craving strikes, or for impromptu gatherings, proving that exceptional homemade bread doesn’t always require an entire afternoon.
Essential Ingredients for Your Honeycomb Bread
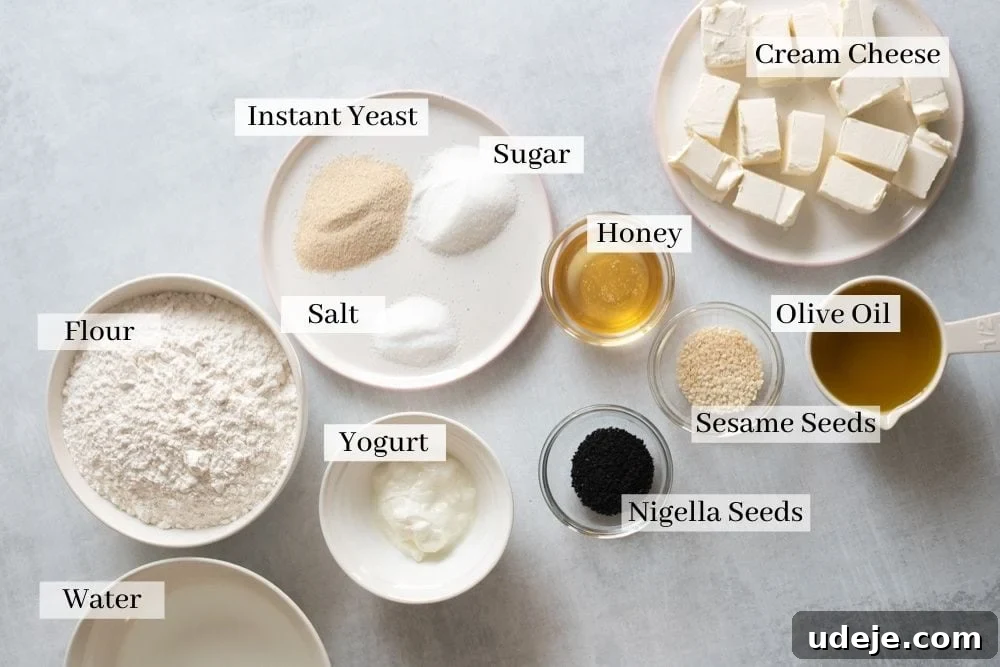
Crafting the perfect Honeycomb Bread begins with a thoughtful selection of common, high-quality ingredients. While the recipe itself is straightforward, understanding the role of each component ensures an optimal outcome. You won’t need anything exotic, just everyday pantry staples and fresh additions.
- All-Purpose Flour: The foundation of our dough. Measuring flour accurately is key to consistency. We recommend spooning flour into your measuring cup and leveling it off with a straight edge for the most precise results.
- Instant Yeast: This is the hero of our 10-minute dough. Instant yeast can be mixed directly with dry ingredients, but for this recipe, we activate it in warm water with a bit of sugar to ensure its potency and kickstart the rapid proofing process. Active dry yeast can also be used, simply proof it in warm water and sugar for 5-10 minutes until foamy before combining with other ingredients.
- Warm Water: Crucial for activating the yeast. Ensure the water is warm (around 105-115°F or 40-46°C), not hot, to avoid killing the yeast.
- Granulated Sugar: Feeds the yeast, helping it activate quickly and contributes to the dough’s golden color and subtle sweetness.
- Plain Yogurt: A secret ingredient for incredible softness and a slight tang. Full-fat plain yogurt is recommended for the best texture and flavor.
- Olive Oil: Adds richness, moisture, and improves the dough’s texture, making it soft and pliable. You can use another neutral-flavored vegetable oil if preferred.
- Salt: Essential for balancing flavors and controlling yeast activity. Don’t skip it!
- Cream Cheese: The star of our filling. We highly recommend using cream cheese in block form rather than whipped or spreadable varieties. This makes it significantly easier to cube into consistent pieces for stuffing, ensuring a uniform burst of creamy delight in every bite.
- Egg: Whisked and used as an egg wash, it provides a beautiful golden-brown crust and helps the seeds adhere to the bread.
- Sesame Seeds & Nigella Seeds: These are not just garnishes; they are integral to the authentic flavor and visual appeal of Khaliat Nahl. Their nutty and slightly peppery notes are unmistakable.
- Honey: Applied immediately after baking, the honey glaze adds a lovely shine and a delicate sweetness, completing the experience.
Mastering the 10-Minute Dough: A Step-by-Step Guide
The brilliance of this Honeycomb Bread recipe truly shines through in its quick and easy dough preparation. Our 10-minute dough streamlines the process, allowing you to achieve a perfectly soft and fluffy base with minimal effort and waiting time. Here’s how to bring it all together:
- Activate the Yeast: Begin by proofing your instant yeast. In a medium-sized bowl, combine the warm water and the instant yeast. Give it a gentle stir and then set it aside for just about 2 minutes. Even though it’s instant yeast, this brief proofing step ensures it’s active and ready to work its magic, guaranteeing a successful rise. You should see a slight foam or bubbling, indicating the yeast is alive and well. Remember, the water should be warm, similar to bathwater, not hot, to avoid killing the yeast.
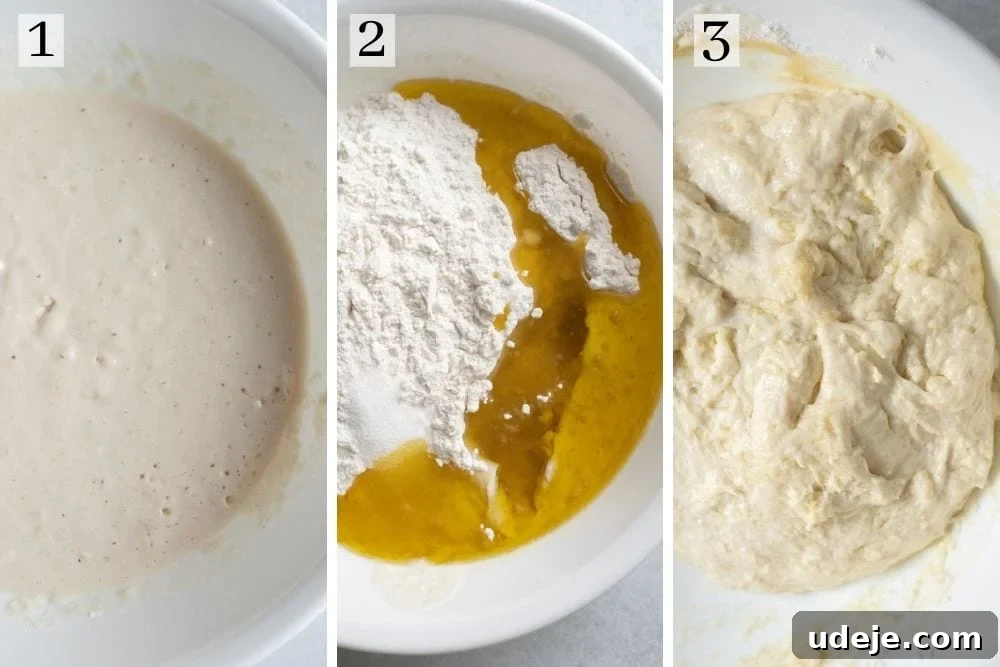
- Create the Bubbly Starter: Next, to the proofed yeast mixture, add 1 cup of the flour (ensure you’re only using a portion, not the entire amount yet), the granulated sugar, and the plain yogurt. Mix these ingredients thoroughly with a spoon until everything is well combined and forms a thick batter. Cover the bowl with plastic wrap or a clean kitchen towel and let it rest for exactly 10 minutes. During this crucial period, the yeast will feed on the sugar, creating a light, bubbly mixture that will be the foundation of your incredibly soft dough.
- Incorporate Remaining Ingredients: After the 10 minutes have passed, peek under the cover – your mixture should have a noticeable bubbly texture, confirming the yeast is highly active. Now, it’s time to add the remaining 1 1/2 cups of flour, the olive oil, and the salt. Using your spoon, mix all these ingredients together. At this stage, the dough will start to come together, looking somewhat shaggy and rough, but don’t worry, that’s perfectly normal.
- The Gentle Knead: Once the ingredients are mostly combined with the spoon, it’s time to get your hands in there. Transfer the dough to a lightly oiled clean surface or continue in the bowl. Knead the dough by hand for just a few minutes. You’ll notice the dough is very soft and will feel slightly sticky to the touch. This stickiness is actually a good sign; it indicates a high hydration level, which is what gives our Honeycomb Bread its signature pillowy, soft texture. If you find it too challenging to handle, simply grease your hands lightly with a bit of olive oil. Continue kneading until the dough is smooth and elastic. There’s no need for extensive kneading; a few minutes is sufficient to develop enough gluten for a beautiful rise.
Assembling and Baking Your Irresistible Khaliat Nahl
With your soft and pliable 10-minute dough ready, the next exciting phase is assembling and baking these delightful Honeycomb Bread rolls. This is where the magic truly comes to life, as individual dough balls transform into a connected, golden masterpiece.
- Divide and Conquer: Once your dough is perfectly soft and ready, it’s time to divide it into equal-sized balls. While you don’t need to be overly precise, using a kitchen scale can help achieve uniform sizes, ensuring even baking. For the most appealing honeycomb shape and individual portion size, we recommend aiming for dough balls that are roughly 45 grams each. This yields a medium-sized roll. You can certainly make them smaller for mini Khaliat Nahl, but we advise against going much larger than 45g. Larger balls might risk losing the distinctive honeycomb shape as they expand and bake, potentially becoming less visually appealing.
- Stuffing with Creamy Goodness: Prepare your cream cheese by cutting it into small, uniform cubes. Lightly grease your hands with a tiny bit of oil to prevent the dough from sticking. Take one dough ball and gently flatten it into a small disc using your greased palm. Place a cream cheese cube (approximately 5-7 grams, or to your preference) directly in the center of the flattened dough. Carefully gather the edges of the dough around the cheese, pulling them upwards and pinching them firmly together to seal the cheese inside. Roll the dough gently between your palms to form a smooth, neat ball, ensuring no cheese is exposed.
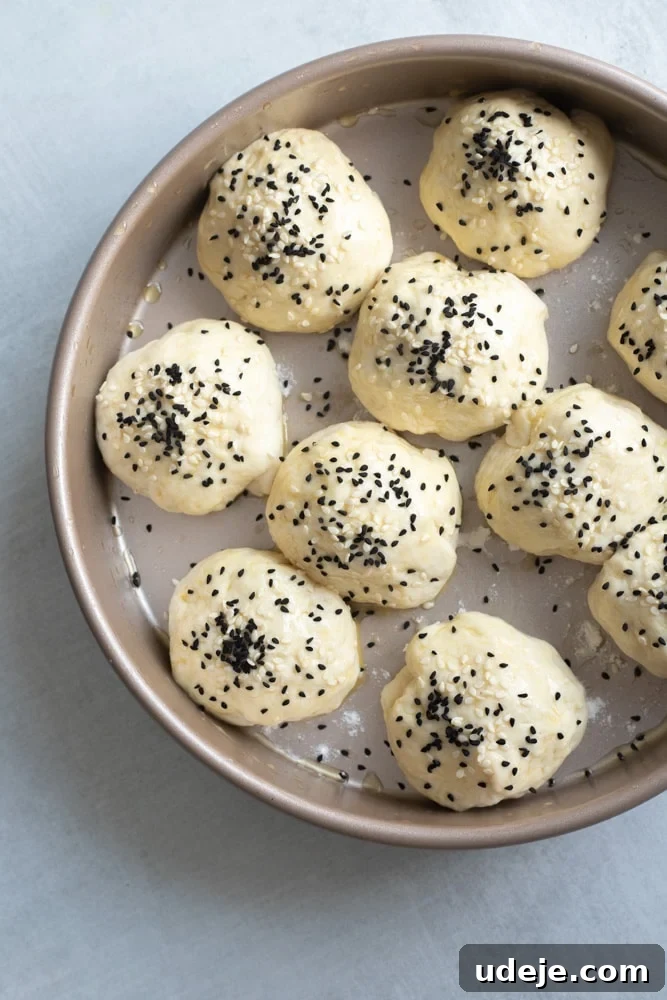
- Arrange for the Honeycomb Effect: Lightly grease and flour your chosen baking pan(s). For 17 dough balls, two 9-inch round pans usually work perfectly. Begin arranging the stuffed dough balls in the pan, starting from the center and working your way outwards. Crucially, leave a slight space between each ball – they shouldn’t be touching initially, but also not too far apart. This spacing is vital for the “honeycomb” effect; as the bread bakes, the balls will rise, expand, and gently merge, creating that signature connected yet separable structure.
- The Golden Touch: Egg Wash and Seeds: In a small bowl, whisk one room-temperature egg to create an egg wash. Gently brush the tops of all the arranged dough balls with this egg wash. This step is essential for achieving that beautiful, glossy golden-brown crust and helps the seeds adhere perfectly. Immediately after brushing, generously sprinkle the tops of the dough balls with a mixture of sesame seeds and nigella seeds. These seeds not only add a wonderful crunch but also infuse the bread with their distinct, earthy aroma.
- Bake to Perfection: Your Khaliat Nahl is now ready for the oven! Bake in your preheated oven at 375°F (190°C) for approximately 25 minutes. Keep an eye on them; they are done when the rolls are beautifully golden brown on top and cooked through. For an extra crisp, deep golden finish and perfectly toasted seeds, you can broil the bread for an additional 2-3 minutes at the very end. Be extremely vigilant during broiling, as it can go from perfect to burnt in a matter of seconds.
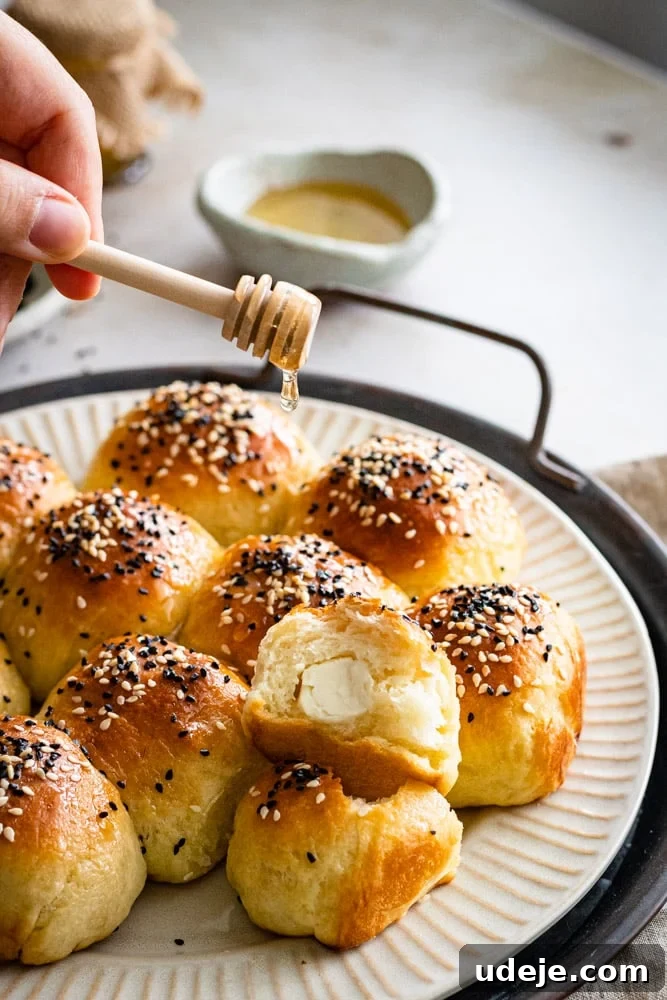
- The Final Honey Glaze: As soon as you pull the golden Honeycomb Bread out of the oven, while it’s still piping hot, immediately brush the tops generously with honey. The warmth of the bread will allow the honey to melt slightly and seep into the crevices, imparting a beautiful shine and that delicate, signature sweetness. This step is non-negotiable for the true Khaliat Nahl experience. Serve your irresistible Honeycomb Bread warm, allowing everyone to pull apart the soft, cheesy rolls and savor their incredible flavor.
Pro Tips for Khaliat Nahl Perfection
To ensure your Honeycomb Bread turns out perfectly every time, here are some expert tips to guide you through the process:
- Embrace Customization: While cream cheese is a classic, don’t hesitate to get creative with your fillings! Savory options include crumbled feta cheese, halloumi, or even a blend of herbs with cheese. For sweet variations, consider date paste, Nutella, or a mixture of brown sugar and cinnamon. Just ensure your chosen filling is not too watery, as it could make the dough soggy or leak during baking.
- Handling Sticky Dough: Our 10-minute dough is designed to be soft and slightly sticky, which is the secret to its fluffy interior. If you find it too challenging to work with, simply lightly grease your hands with a bit of olive oil. Avoid adding too much extra flour, as this can make the bread dense. A thin layer of oil on your palms will make shaping and stuffing much easier.
- Achieving a Golden Crust: For that irresistible, deep golden-brown top and perfectly toasted seeds, don’t shy away from using the broiler. After the initial baking time, switch your oven to broil for just a few minutes. Watch it constantly, as broiler temperatures can vary, and bread can burn very quickly. The goal is a beautiful golden hue, not a charred top.
- Adjusting Sweetness: The amount of honey brushed on after baking can be adjusted to your preference. For a less sweet bread, use less honey or omit it entirely. If you prefer a much sweeter treat, you can prepare a simple syrup (equal parts sugar and water, boiled until sugar dissolves, then cooled) and brush it generously over the hot bread.
- Pan Preparation: Always grease and flour your baking pan to prevent sticking. For easy removal and cleanup, you can also line your pan with parchment paper before greasing. This ensures your beautiful honeycomb bread comes out intact.
- Serving Suggestions: Khaliat Nahl is incredibly versatile. Serve it warm for breakfast or brunch with a cup of Arabic coffee or hot tea. It also makes a delightful dessert or a comforting snack any time of day. Its pull-apart nature makes it perfect for sharing!
Storage and Reheating: Keeping Your Honeycomb Bread Fresh
One of the many convenient aspects of Honeycomb Bread is its freezer-friendly nature, allowing you to enjoy this delightful pastry long after it’s baked. To maintain its freshness and flavor, proper storage is key.
For short-term storage, keep any leftover Khaliat Nahl in an airtight container at room temperature for up to 2-3 days. While still delicious, the bread is best enjoyed on the day it’s made, when it’s at its absolute softest. For longer preservation, Honeycomb Bread freezes exceptionally well. Once completely cooled, you can freeze the rolls individually by wrapping each one in plastic wrap, or freeze them together in an airtight freezer bag or container. This method is ideal if you plan to enjoy a few pieces at a time. Frozen Khaliat Nahl can be stored for up to 1-2 months.
When you’re ready to enjoy them, simply thaw the bread on the counter at room temperature for a few hours. For optimal warmth and softness, reheat them in a preheated oven at 300°F (150°C) for about 10-15 minutes, or until warmed through. Alternatively, a quick zap in the microwave for 20-30 seconds per piece can also work, but be cautious not to overheat, as this can make the bread tough. A freshly warmed Honeycomb Bread will almost feel as good as straight out of the oven!
Frequently Asked Questions About Khaliat Nahl
Here are some common questions about making Honeycomb Bread (Khaliat Nahl) that might help you perfect your bake:
- Can I use active dry yeast instead of instant yeast? Yes, you absolutely can! If using active dry yeast, proof it first by dissolving it in the warm water with a teaspoon of sugar for about 5-10 minutes until it becomes foamy. Once activated, proceed with the recipe as directed.
- What if my dough isn’t bubbly after 10 minutes? If your dough starter isn’t bubbly, it could mean your water wasn’t warm enough (or too hot), or your yeast is old/inactive. Ensure your water temperature is between 105-115°F (40-46°C). If the yeast doesn’t activate, you might need to try a fresh batch of yeast.
- Can I make Khaliat Nahl less sweet? Absolutely. The honey glaze is applied after baking, so you can easily control its amount. For a less sweet version, use less honey or omit it entirely. You could also opt for a savory glaze, like a light olive oil brush.
- What other fillings work well? Beyond cream cheese, many fillings are delicious. Try different cheeses like feta (crumbled), ricotta, or even a blend of mozzarella and cheddar. For sweet options, Nutella, date paste, or even a simple cinnamon-sugar mixture are popular choices. Ensure any sweet fillings are thick enough not to leak.
- How do I prevent the cheese from leaking? The key is to thoroughly seal the dough balls after stuffing. Pinch the seams firmly together and roll the ball gently to ensure there are no openings. Also, avoid overfilling, as too much cheese can cause leaks.
- My bread turned out dense, what went wrong? Density can occur if too much flour was added during kneading, if the yeast wasn’t active, or if the dough wasn’t allowed enough time to proof (even with our 10-minute dough, the initial activation is crucial). Make sure to measure flour correctly and don’t add extra if the dough feels sticky – use oiled hands instead.
Other Middle Eastern-Inspired Recipes You’ll Adore
If you’ve fallen in love with the flavors of Khaliat Nahl, explore more delicious recipes that celebrate the rich culinary traditions of the Middle East and beyond:
- Cardamom & Tahini Energy Date Balls
- Za’atar & Feta Cheese Pies
- Healthy Banana Bread
- Date and Walnut Cake
If you tried these recipes, please consider leaving a star rating and review below! We’d love to hear from you. You can also hop on over to Instagram and say hello!
Full Recipe: Honeycomb Bread Stuffed with Cheese (Khaliat Nahl)
Honeycomb Bread Stuffed with Cheese (Khaliat Nahl)
Ever tried Honeycomb Bread? It’s delicious pillow-y soft bread balls that are stuffed with cream cheese, topped with crunchy sesame and nigella seeds, and then brushed with honey for a subtle sweetness. This recipe uses a 10-minute dough which makes this dish come together in no time!
- Yield: 17 servings
- Prep Time: 25 mins
- Cook Time: 25 mins
- Author: Amina Al-Saigh
Leave a Review
Pin Recipe
Ingredients
- 2 1/2 cups flour, divided into 1 cup and 1 1/2 cups, measured using a spoon and leveled off flat
- 1 tablespoon sugar
- 1 tablespoon instant yeast (see notes for active dry yeast)
- 1 cup warm water
- 2 tablespoons plain yogurt
- 1 teaspoon salt
- 1/2 cup olive oil, or any other vegetable oil
- 150 grams cream cheese, can use between 120 grams to 150 grams, preferably the block cheese so it’s easier to cut
- 1 egg, whisked at room temperature (for egg wash)
- 1/2 tablespoon sesame seeds
- 1/2 tablespoon nigella seeds
- 1/4 cup honey
Instructions
- Start by preheating your oven to 375°F (190°C).
- To make the 10-minute dough, mix together the warm water and yeast in a bowl and set aside for 2 minutes to proof until slightly foamy.
- In a separate bowl, add 1 cup of the flour (not all of it), the water and yeast mixture, the yogurt, and the sugar. Mix together well with a spoon, then cover with plastic wrap and set aside for 10 minutes. The mixture should become a little bubbly.
- Meanwhile, cut the cream cheese into cubes. I used about 5-7 grams per dough ball, but that is per preference.
- After 10 minutes, the mixture will look a bit bubbly. Add to it the rest of the flour (1.5 cups), the olive oil, and the salt. Mix well using your spoon to bring the dough together.
- Then use your hands to knead the dough for a few minutes and bring it together. It will be a soft and slightly sticky dough (which will give us that fluffy texture), so you can use a bit of oil on your hands to handle it.
- Shape the dough into equal-sized balls. I weighed out roughly 45g per dough ball using a kitchen scale, but you can eye this – see notes for sizes.
- Flatten each dough ball with your greased hands and place a cheese cube in the middle, then carefully close up the dough, pinching the seams firmly.
- Place the stuffed dough balls in a greased and floured pan, ensuring you leave space around them as pictured. They will expand in the oven. I used two 9-inch pans for 17 balls.
- Brush the balls with the whisked egg wash, then sprinkle on the sesame seeds and nigella seeds.
- Bake for 25 minutes, then broil the top for a few minutes until a deep golden brown, watching carefully to prevent burning.
- Brush them generously with the honey as soon as they’re out of the oven. Serve warm and enjoy!
Notes
- You can also use active dry yeast in the same way, just ensure it proofs properly in the warm water for 5-10 minutes before combining with other ingredients.
- 45g is the size of the balls in my photos, and they’re the biggest I’d recommend you go – they’re a good size for one person to have 1-2. You can go smaller to make them more mini as well, perfect for appetizers.
Nutrition Information
(Per serving, approximate values)
- Serving Size: 1 serving
- Calories: 180 kcal
- Carbohydrates: 20g
- Protein: 3g
- Fat: 10g
- Saturated Fat: 3g
- Polyunsaturated Fat: 1g
- Monounsaturated Fat: 6g
- Trans Fat: 0.001g
- Cholesterol: 19mg
- Sodium: 171mg
- Potassium: 47mg
- Fiber: 1g
- Sugar: 5g
- Vitamin A: 135 IU
- Vitamin C: 0.1mg
- Calcium: 20mg
- Iron: 1mg
Did you make this recipe? Please leave a star rating and review below! We’d love to hear about your experience.